
Hybrid Build

Hybrid bottom end for sale HERE:
The KDX 200 is coming out and I will be putting this 220 engine into the hybrid.

This is a brief overview of my hybrid build using a 2004 KX 125 bike and an H series KDX 200 engine. I didn’t detail every step (like cutting off the original motor mounts and welding new ones on) but tried to cover some of the unique things I ran into with this build.
Here is the KX roller I’m starting with. I had a CraigsList wanted ad and a person who lived in Florida responded with these pictures. His company makes weekly deliveries to Atlanta. Once we worked out a price, he put it on a trailer and I picked it up:


In my basement:

There are a couple of things that need to happen to fit the KDX engine into the KX frame. The swingarm needs to be cut to fit the KDX engine and the KDX engine needs to be modified to accept the larger (17mm) swingarm bolt. I decided to have a machine shop do the work on the engine, I didn’t want to risk screwing up the cases. I used my table saw to cut the swingarm.
I made this jig to hold the swingarm inplace, it works by holding the rear axle in position and the sled is fed into the saw blade. The first step is to secure your table saw fence in some arbitrary position so you’ll have at least 6-8 inches on both sides of the cut. Then run the piece of plywood into the blade another 6-8 inches. This cut will be your reference for aligning the swingarm.

Here is the swingarm clamped in place by the rear axle:

And this is what the swingarm sled looks like after the cut was made:

I believe I spent about 20 minutes building the jig and then it took just a few minutes to position the swingarm in the sled and make the cut. The cuts are pretty clean as-is and more than accurate for this application.

Once the swingarm was cut, I needed to install new bearings. I used a vice and sockets to seat the new bearings:


The bearing kit I bought had a new Teflon bearing (original is on the right) that was said to be better at withstanding mud and sand. When I grease everything over the winter we’ll see how it looks.

No more engine mounts.

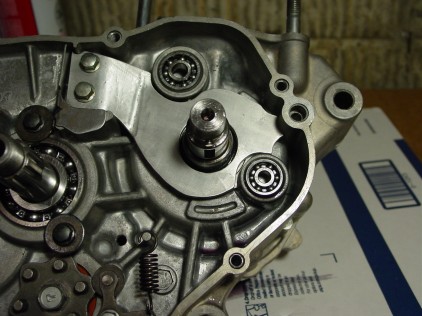
Once I got the engine back from the machine shop, it was time to get the engine in the frame to get the proper positioning. In my mind, the greatest concern with positioning the engine is getting correct alignment with the swingarm pivot bolt and the counter shaft. If the engine tilts too far down or up, at the very least you’ll get excessive wear on the chain slider.


I used the Pro Circuit Platinum II pipe which fit perfectly. I didn’t have to dent, cut or bend the pipe at all to get it to fit. A KX250 silencer from an ’04 bike fit up perfectly as well.
Before finishing the final welding on the motor mounts, I bolted everything up to make sure I had adequate clearance.


Making the KX airbox work with the KDX engine took a little bit of work. I’ve got some of those details HERE.
Once everything checked out, it was time to sandblast the frame. I made this very sophisticated sandblasting cabinet. I bought the replaceable sandblasting ‘window’ and taped them into place. Those along with a halogen shop light made it easy to see what I was doing.

Once I was done sandblasting, the frame was primed,

then painted with VHT Rollbar and Chasis paint.

Here are the front and rear head stays I made. The aluminum ones are for the front, and the black ones are just steel welded to shape.

Once the paint had cured, it was time to start putting everything together.


I originally had the stock KX tank and didn’t have any clearance issues with the tank and cylinder head. But I got a good price on a used IMS tank from eBay and did have a small conflict. The edge of the coolant nipple is just touching the tank. I think I could have made everything co-exist, but I didn’t want the constant pressure of the tank against the coolant hose.

Others have used various techniques to mold the tank to clear this type of obstacle. This part of my tank is really thick and I didn’t want to take a chance of heating the plastic too much and making a hole or weakening that section.
The approach I took was making an adapter out of 1/2″ aluminum that would rotate the coolant nipple away from the tank. Below is a series of different pictures of this adapter.


Below is a view of the two pieces bolted together along with a gasket I hand cut.

This approach of rotating the coolant nipple also made the coolant hose hook-up more straight forward. In the original position, I had to cut the KX hose, install a brass fitting and then rotate the end that goes on the cylinder head. With the new orientation, I just had to cut the end off the KX hose and use it as is. Below is a comparison, the original version with the splice is on the left and the non-spliced is on the right.

Here are some pictures of what the updated configuration looks like.


Plenty of room now.

This is how the bike looked after the last bolt was tightened and rolled out of the workshop.


Leave a comment